Well, spring is here in the Bay Area and the days are getting warmer and longer.
And with more warm weather comes sunshine. And as always, that means more lemons from my friend’s lemon tree. Actually, here in California we are blessed with lemons hanging all year round.
I love lemon-y anything!
So when life hands you lemons, what do you make?
Cakes, cookies, muffins and pies. That’s what!
And what goes with lemon? Poppies Poppy seeds, that’s what. And I love poppy seeds.
Those little crunchy poppy seeds with their bursts of nuttiness. There’s nothing like a sweet pastry, cake, cookie or dough laced and filled with poppies…Â IÂ mean poppy seeds!
I first developed this muffin a couple years ago, after my shoulder surgery, when I started using the Carnbite® Solution Plan, which I stayed on for about 1 1/2 years ( A little too long, but that’s another blog I’ll be following up with).
So it was during this time I was inspired to start baking more gluten free deserts for both me and my clients.
And I had a real yen for lemon poppy seed bread.
After many failed attempts, and a bunch of bricks, I finally came up with my own gluten free version for lemon poppy seed muffins, which are also delicious baked as small tea cakes.
I use Kabocha squash, also known as Japanese pumpkin, because of it’s rich creamy texture, and is my ‘go to’Â substitute for fat in almost any baked good. But you can also use canned pumpkin, or another winter squash.
As you make more of my recipes, you’ll see that I use Kabocha in most of them. It’s super nutritious and packs a punch with vitamin A. It’s a bit starchy though, so a little goes a long way.
This muffin is by no means low carb, so it can be a great addition to your post workout protein to round out the meal.
But my favorite time to have this is for my desert after dinner, when I let those carbs coax me into a deep sleep, where I dream of…  poppies …I mean my next days challenge in the weight room!
Be careful though, as the Yum factor of this muffin is quite high, and you may find yourself stuffing your face with the whole bunch!
Let’s start baking!
Photo credits go to my good friend Jos at www.delightfultastebuds.com. Make sure to visit her site full of yumminess!
A quick and easy gluten free lemon poppy seed muffin made with kabocha pumpkin squash and rice flour
Author: DebbyK
Recipe type: Desert
Cuisine: American
Serves: 6
Ingredients
½ cup white rice flour
1 tsp baking powder
½ tsp baking soda
¼ tsp salt (I used fine sea salt)
3 tbs sweet potato starch or potato starch. You can buy sweet potato powder(starch) at local Asian market or maybe on Amazon
10 gram whey isolate (i use zero carb raw pastured from Z-natural)
½ cup baked kabocha (Japanese pumpkin)squash that is pressed into the ½ cup measure cup. You can also use butternut or acorn squash. Canned pumpkin is an option too if you don’t have any winter squash.
2 egg whites
1 tsp coconut oil
3 tbs lemon Juice
2 tbs water or almond milk
1 tsp vanilla
¼ Stevia, or to taste. Or ½ cup erythritol (I've also used about ½ cup granular Splenda )
1-2 tbsp poppy seeds. Macros are for 1 tbsp
Instructions
Mix dry together in small bowl, except sweetener and poppy seeds
In medium bowl , using hand mixer, blend together wet ingredients and sweetener.
Add dry to wet and mix with spoon until smooth and everything is incorporated
Fold in poppy seeds
Using approximately ¼ cup measure, divide batter into 6 silicon baking cups, or 6 paper lined muffin tins (note that rice flour baked goods will stick to the sides of paper liners and make it hard to peel off); or divide into TWO 3†non stick ramekins (or lightly oiled non stick ceramic ramekins)
It should make 6 muffins. I think the last muffin was short so I took like ½ tsp out of others to even it out
Bake 365 for 30-40 minutes depending on if you’re using small muffin cups or 2 larger ramekins. Smaller muffins check at about 25 minutes. Mine usually take about 35 minutes, but it depends on if my oven is running on the cooler side.
Tops should be brown.
Test a muffin by slicing out a small portion. If the center is still a bit gooey put back in oven for another 5-8 minutes. The toothpick test may not necessarily work with this muffin
Cool muffins for 5 minutes before removing from cups
These are amazing with coconut oil, coconut butter, or even a blueberry compote drizzled on top!
As I sit here on my ball, writing my post, the scent of chocolate is wafting it’s way throughout my apartment and under my nose. This is causing quite a stir. With me anyway, since I’m the only one here, and I know how amazingly good this low carb melt-in-your-mouth chocolate brownie cake is!
And I can almost guarantee that you will soon add these chocolate melt-in-your-mouth brownies to your list of ‘go to’ and ‘must haves’!
Now, for those of you who know me, or who’ve clicked around on my blog, here, and here, you know that I’ve been sugar, and processed-foods free for the past 26 years.
But that doesn’t stop me from indulging in a bit of decadence-low carb style. And that’s just how my low carb melt-in-your-mouth chocolate brownies make you feel: like you’re diving into a box of Swiss chocolates!!
They’re super chocolatey, with a slightly sticky, merengue-like top. And, they have crisp sides, which has always been my favorite part of a brownie.
Ahhhhh…and when you sink your teeth into one…it’s so light and airy… and just melts in your mouth.
They will melt in your mouth after each bite!
OK! Well, I don’t want to make you wait any longer…so here’s what to do:
Make the kabocha squash mixture and set aside.
Creamy Kabocha squash mixture should be like a thick gravy or sour cream consistency.
Sift together dry ingredients following recipe directions, and set aside.
Beat eggs until frothy, and then add in the cream of tarter,
Beat until soft peaks form,
and then add in the sweetener of choice (see notes in recipe), a little at a time, and continue beating until stiff peaks form
Beat egg whites just until stiff peaks form
And then add the kabocha mixture gently on top, and spread around a bit, making sure not to break the whites.
Kabocha mixture should sit on top of egg whites
Then fold the mixture gently into the egg whites. (You can watch the video on folding here)
Slowly fold kabocha squash mixture into beaten egg whites
Until they look like this
Folded to perfection with lots of volume
Then, take 1/4 of the dry mixture and sift it over the egg whites. Then fold this into the egg whites gently. Repeat this step three more times. It will eventually look smooth and creamy like this.
The dry mixture has been nicely folded into the kabocha/egg white mixture. Make sure that all the large and small clumps have been bursted and incorporated
You’re almost done!
Now pour this lusciousness into the prepared tin.
Tap the pan on the counter to take out all the air bubbles. Look how nice and smooth the batter is!
And bake, following the directions below, until it looks like this.
Waiting to be cut and plated for some eating pleasure!
Or if you are a square, like this!
(Personally, I prefer to bake these in one of those grocery store 7″-8″ cheap pie pans because the bottom and edges come out super crispy).
Let cool without going nuts (Oh, you can fold those into the batter at the end if you want!)
Slice and plate them up, like this, if you want!
Or this…
They will melt in your mouth after each bite!
Or this…
Almost too pretty to eat…NOT!
Honestly, I couldn’t wait this long with my first batch. They were gone, baby, gone!
Really, whichever way you choose to bake these, it’s like eating milk chocolate truffles (that recipe’s coming soon!).
Ha! I should have called it my milk chocolate truffle cake!
Alas, let’s get baking!
All photos credited to Jos. Be sure to check out all her yummy recipes, too!
5-6 Tbsp water (this really depends on how watery or starchy your kabocha squash is. Add 1 Tbsp each time until you got that thick gravy/sour cream consistency
Large Stainless Steel, Copper, or Glass mixing bowl
Medium size bowl
2 small bowls
Rubber spatula
Mixer, either hand or stand
Sifter
Instructions
Preheat oven to 350 F.
Lightly grease 7-8 inch tin with coconut oil
In a medium size bowl, separate the egg whites and the yolks (best done when the eggs are still cold straight up from the fridge). Reserve the yolks for another use.
Grind ½ cup granulated Splenda in a coffee grinder until it becomes powdered
In a separate bowl, mix coconut flour, whey protein powder, baking powder, powdered Splenda, cocoa powder, and salt.
Sift the dry ingredients.
In another bowl, mix mashed baked kabocha with 1 Tbsp coconut milk, 1 tsp vanilla extract and 1 Tbsp of water. Mixture should resemble thick gravy. Don't make it too watery. If the batter gets too watery, a quick remedy would be mix about 1-2 tsp of the sifted dry ingredients.
By this time, the egg whites should be at a room temperature.
Using a hand mixer with a whisk attachment, lightly beat egg whites until foamy.
Lower the mixer speed, then put in ⅛ tsp cream of tartar. Increase the mixer speed and beat until soft peaks formed.
Lower the mixer speed, then mix in ¼ cup granulated Splenda. Mix it slowly until everything incorporates so you won't have the Splenda flying around.
Beat the egg whites until stiff peak formed.
Pour in the kabocha/coconut milk mixture and carefully fold into the egg whites. Please watch video on folding below:
Once the batter is mixed, sift ¼ of the dry ingredients on`to the egg white. Carefully fold the dry ingredients into the egg whites mixture. Repeat this three more times, until you use up all the dry ingredients.
Fill your 7-8 inch tin with the batter.
Bake in 350F for 45-50 minutes
Remove from oven and let sit about 15 minutes before removing from the tin. They come out easier this way.
Slice and enjoy!
Notes
Take your time when folding all the ingredients into the egg whites. And make sure to break apart, very gently, any lumps or bubbles of dry mix that you see.
The best way to do this is by lifting the lumps onto your spatula and breaking them apart by tapping the spatula on the side of the bowl.
Using Splenda: I use ½ cup of the Splenda granules (not the baking Splenda or packets) and then powder that for the dry mix, and use ¼ cup for the egg whites.
When Debby shared her recipe to me, I couldn’t wait to try them out and it has become one of my staple low carb treats whenever I need a sweet-tooth fix. FYI, in general, I am not a sweet tooth person but once in a while, that thing kicks in.
I enjoyed her Low Carb Melt-In-Your-Mouth Lemon ‘Chiffon’ Poppy Seed Cake (in these photos, I made them in muffin tins). When she posted her recipe, she told me that the cake will go very well with my Lemon Curd, which I posted on my blog here.
Since her recipe yields extra 2 egg yolks, I am thinking instead of having you figuring out how to scale down my original Lemon Curd recipe, might as well I do it for you, right?
A yummy dairy-free lemon curd. Perfect companion for Low Carb Melt-In-Your-Mouth Lemon ‘Chiffon’ Poppy Seed Cake.
Author: Jos
Recipe type: Dessert
Cuisine: American
Serves: 1
Ingredients
2 egg yolks
1 Tablespoon full fat coconut milk
1 Tablespoon erythritol
½ tsp liquid SweetLeaf Vanilla Stevia
1-2 tsp lemon juice (if you like it tart)
1 tsp liquid lemon extract
½ tsp lemon zest (optional)
Instructions
Mix all ingredients in a bowl and heat on a double boiler on medium heat. Stir constantly. If you don't have a double boiler like me, you could place the bowl on top of a sauce pan filled with water. Just make sure the bowl isn't touching the water.
Mix until the mixture thickens but be careful not getting it too hot or you'll end up with scramble egg yolks. (usually takes about 7 minutes at least).
Once the mixture thickens, remove from heat and let it cool to room temperature.
Cover the curd with plastic wrap directly to prevent skin forming. Refrigerate for about 1 hour.
Crisp on the outside…sweet and creamy on the inside.
Hello Your Fit Day Friends!
I want to let you in on a secret. Carbs are not evil. Really. They’re not. And neither are my Gluten-free Rice Flour Pumpkin Skillet Biscuits. Trust me on this one! It’s more about which carbs you choose, how you cycle them into your diet, and how to make them work for you.
If you haven’t read my last post, where I talk about why I’m using the Carbnite® Solution Plan, stop and click here first. That should explain it all. Well, a lot anyway.
Now, I’m all about helping you stay lean and fit, so some of the best times to indulge in my starchy treats would be:
After a weight training session, preferably in the evening.
When you’re on a Low Carb High Fat ‘diet’, where a re-feed of starches will help boost your metabolism. (Low Carb diets are typically low calorie, due to the satiating effects of fat. You are eating more fat, aren’t you?!!)
Anytime, Â because you really don’t care about all this carb timing stuff; you’re here mostly for the yummy gluten-free and sugar-free recipes, high carb or low carb; and because you want to impress someone with your gluten-free, sugar-free baking skills instead of serving them bricks. I know, I’ve had my share of them too!
So, I’ve decided to travel outside the box of my post-workout-world staples of straight-up sweet potatoes and kabocha squash, and get creative in the kitchen. And I’ll be delivering them to you one bite at a time, all gluten-free and sugar-free!
First, I thought I’d give my hand a try at making some biscuits. You know, those light, fluffy, flaky shortcakes, that catapult you into a state of carb-coma euphoria.
But when I was searching the web for “gluten free rice flour biscuits” I hit a stumbling block: I could only find super high-fat and sugar laden recipes, most of which included slow carb flours from grains and legumes. Not exactly what we’re looking for post-workout, or for a program like Carbnite®, which you read about here.
So after some searching and tweaking of recipes, I think I came up with a pretty good gluten-free, sugar-free, low fat biscuit. Sounds like an oxymoron, doesn’t it?
Ah ha! But it’s not! And to prove it, below is my modified version of a skillet biscuit I found over at The Daily Diatribe. I replaced most of the fat, and all of the applesauce (fructose), with Japanese pumpkin (Kabocha squash); and I used stevia instead as the sweetener, instead of the maple syrup.
You could use any type of dense starchy winter squash if you don’t have Japanese Kabocha pumpkins. Or you could use canned pumpkin. However, I can’t vouch for the canned pumpkin because I haven’t tried it yet. But I’m sure it would work. Although, I wouldn’t add any extra water to make a mash, since canned pumpkin is already the right consistency. If you do try it please let me know how they turn out in the comments below.
Mind you my version didn’t end up exactly light and fluffy, like regular biscuits. Â Instead they are a bit flatter, crispy on the outside, with a creamy and sweet, baked porridge-like texture on the inside; and very carb-coma worthy!
I also saved out two 1/4 cup portions of the batter and baked them at 400 degrees F for about 30 minutes until the tops were a deep golden brown. They save you a bit of fat and I think they are just as crunchy and creamy and delicious.
I find both ways rather addicting.
For some extra added comfort I drizzled a few swirls of my homemade lemon-blueberry compote on top…Divine! (Recipe coming soon)
Some Variations to try:
Bacon Skillet Biscuit (I have not tried this as of yet, but I imagined it to be yummy?): Cook 4 strips of bacon until crisp. Cut each slice in half, so that you have eight pieces. Â Crumble each 1/2 strip. Â Gently press each 1/2 crumbled strip into each 1/4 cup of scooped batter before ladling onto skillet. Cook per directions.
Blueberry Skillet Biscuit (I have tried this and it is yummy!): Wash and pat dry 8 oz of organic blueberries. Divide into eight separate one ounce servings. Dust each ounce serving with rice flour. Add one ounce of blueberries to each 1/4 cup of scooped batter. Cook per directions.
Chocolate chip variation (I have not tried this yet, but chocolate with everything, including bacon, is yummy!): Measure out eight 1 oz servings of gluten free dark chocolate chips. Add one ounce of chips to each 1/4 cup of scooped batter. Cook per directions.
Savory Chive and Herb (I have tried this with my Ultra Low Carb biscuits-recipe coming soon-and they are Yum Yummy!):Â For savory biscuits you can fold in some fresh chives, or your favorite blend of fresh or dried herbs, to the mixed batter. Cook per directions
I hope you like them as much as I do. Please let me know in your comments below.
And don’t forget to sign up for my newsletter, in the above right hand corner, so you don’t miss out on the fun!
A sweet and savory biscuit with a hint of vanilla. Lightly cooked in coconut oil on your skillet makes for a crisp savory crust with a sweet creamy inside, similar to a thick griddle cake. You can also try baking these biscuits too.
Author: DebbyK
Recipe type: Appetiser
Cuisine: Gluten Free
Serves: 8
Ingredients
1 cup non-dairy milk (I used Whole Foods 365 Almond milk unsweetened)
1 tablespoon apple cider vinegar
1⅓ cups white rice flour (not sweet white rice flour or brown rice flour)
¾ teaspoon baking soda
¼ teaspoon salt
2 tablespoons melted coconut oil
4 tablespoons sweet potato mash (4 tbsp baked kabocha squash* with 1-3 tbsp of water to make puree the consistency of applesauce. This is important. This will depend on the moisture content of your winter squash. You will end up with slightly more puree than 4 tbsp. I usually add it all since it's just a little bit more)
¼-1 tsp liquid stevia, to taste. Start with small amount as it's very potent.
1 teaspoon pure vanilla extract
* You can also use winter squash such as acorn, butternut.
* You can also use canned pumpkin, but you don’t need to add any extra liquid to make it a puree, since it's already the right consistency.
Instructions
Stir together the milk and apple cider vinegar and set aside to curdle. Begin heating a skillet on medium to allow it to get nice and hot.
In a medium bowl, whisk together the flour, baking soda and salt.
Add the oil, kabocha mash puree and vanilla to the milk and stir.(If making savory biscuits then omit vanilla and instead add your favorite spices, maybe onion powder, garlic, red pepper flakes, to flour mixture). These are still savory-sweet, if you stick to original recipe.
Make a well in the center of your dry ingredients, pour in the wet ingredients, and stir together just until completely mixed.
Add oil to your skillet(I just coat the pan), then scoop the batter into the skillet, using a ¼ measuring cup per biscuit. Try and shape the biscuits so they are high when you scoop them out of the measuring cup. (Actually, I whacked the pan to get them out; or you can be more civilized and use a spoon).
Cook for 4 minutes, then flip. Immediately cover the skillet with it's lid (or find something to cover it with) and cook for another 4 minutes.
I didn't have a top so mine were a bit flat, but they still puffed up.
Remove from skillet and let cool about 5 minutes before serving.
If they are not crispy for your liking, or you prefer the centers to be a bit more baked, you can put them into an oven at 350 for a few minutes to crisp them up.
Best eaten warm.
Notes
You can also bake the biscuits in a pre heated 400 degree F oven for about 30 minutes, or until the tops are a deep golden brown. I kept biting into mine to see if they were done. After about 30 minutes of taste testing, and not much biscuit left, I proclaimed them to be delicious!
These freeze well in a zip lock bag. To reheat simply thaw and bake for about 5-8 minutes in a 300 degree oven or until crispy and crunchy again.
Nutrition Info for the Variations Per Biscuit
Bacon: Fat:8.5grams; Protein: 6.5grams ; Carbs same as original
Blueberry: Carbs:29grams ; Fat and Protein same as original
Chocolate Chips(Enjoy Life Brand): Fat:13 grams ; Carbs:41grams ; Protein:5
I know, it’s been a long time since I’ve updated my blog. Yes, I’m a bit of a procrastinator when it comes to blogging. But I have been working on this post now for a few months. Let me explain…
For those of you who are on my newsletter list you’ve already been updated weekly about what’s going on. For those of you who are now just joining us here at Your Fit Day, the news is that I had shoulder surgery May 10, 2012, seven months after my hips surgery, which was in October of 2011. I apologize for the gap, but life really got in the way of my life, not to mention blogging. But now that things are settling down I’m back. Yippee!
My body went through a lot of changes during both of these surgeries, especially right after the second one, my shoulder surgery. I lost a lot of muscle on the second surgery, the one for my shoulder. I did the best I could to maintain my fitness, but because I was so close in months post hip surgery to having major shoulder surgery on the opposite side of my body, I was quite limited in what I could do.
So here’s the update on what helped keep my metabolism humming as best as it could after my shoulder surgery, and my body from atrophying as little as possible.
Why TheCarbnite®Solution Protocol
Almost a year and a half ago, and about two months into my recovery from my shoulder surgery, I started a cyclic ketogenic diet, using John Kiefer’s Carbnite®Solution as a way to help regulate my metabolism and carb intake ( which I tend not to take in when I’m not training). And I believed that using a cyclic ketogenic diet would help me through my recovery from recent shoulder surgery while not training. I wasn’t unfamiliar with Kiefer’s book, as I’ve referred and coached many friends and clients through it over the years since the book first came out.
I like Carbnite® Solution because it has many similarities to some of the low carb and carb cycling protocols that I have used over the past two decades to maintain my lean fit body, as well as getting in shape for fitness competitions, events, and photo shoots. And also because Kiefer’s book is educational and explains well why you don’t want to go very low-carb for too long, and that eating fat is OK.
Yes!! I get to eat schmaltz!
Now, maybe I’m just a wee bit biased because several years back, when Kiefer lived in Oakland, CA, he helped me a great deal with my nutritional programming when I was doing a lot of endurance training along with my strength training. He was very generous with his information and gave me great advice…that worked.
But that aside, Kiefer is highly regarded as a fat loss expert, you can always count on him to present a ton of research to back up his programs and articles, and in my opinion he’s not the type of guy to shove a piece of schlock on the shelf.  I’d say he’s on my list of to be trusted fitness authors!
My Past 25 Year Diet Overview
I’ve only been following a strict Carbnite® Solution protocol and ketogenic diet for about one and a half years now. Before this, and roughly for the past 25 years, the bulk of my meals were predominantly lean protein like tuna and turkey, deep cold water fishes, and vegetables.
I remained pretty low in fat (except what you would find in fatty fish), with small amounts of carbs cycled around my training times; sometime before, sometimes after, sometimes both.
And there were periods where I was even very low starchy carbs, relying mostly on veggies for carbs. I’ll admit, those were times I should have been eating a bit more starchy carbs with all the training I was doing.
About The Fat
It wasn’t until about four years ago that I even started cooking with added fats, instead of just using a non-stick pan.. My option was is coconut oil. The higher fat protocols were always very interesting to me, but being a child of the 80’s and 90’s I was part of the ‘low fat to no fat’ frenzy! This obviously changed as I learned more about keto diets.
I was also red-meat free up until about one and a half years ago (save for bison and buffalo when I could afford it, and the venison that my friend gave me during hunting season, which was seldom!). That’s when I added grass fed and pastured ground beef and lamb back into my diet, after abstaining for 35 years!! I can’t believe what I was missing!!
Slow roasted salmon collar and skin. Pure Omega 3’s! Photo by Jos (Delightfultastebuds.com)
You could say that before adding red meat back into my diet I was mainly a ‘tur-pescatarian’ ( That’s my made up name for a turkey/fish eater!). But I enjoyed mostly the fattier fishes, like sea bass (back then it was not yet on the endangered list and only $1/lb for the chowder fish), turbo, and fresh wild albacore; and especially the collars, skins, bellies and remnants of halibut (I now include salmon bellies, skins and collars).
Come to think of it, fat was pretty much seasonal for me. When the halibut were jumping, which was about six months of the year, I’d venture to guess that my diet was very high in natural fat from all of the pure fish oils that were in the skins, bellies, collars, and cartilage that I ate during the week.
Halibut collars fresh from the fish monger! I would literally eat the entire collar…YUM! Photo by Jos (Delightfultastebuds.com)
I mean, literally, I’d eat the sweet bubbling succulent fat that oozed from just under the fatty crispy skins, and spoon up the savory sizzling oil right from the oven skillet! I even ate eat the bones of the halibut and salmon too. I left leave nothing! I was like am a coastal cave woman! This is how I still love to eat.
PumpIt Up
Now, back in the late 80’s and into the mid 90’s, I did the super-low-fat bodybuilding lifestyle of oatmeal, cream of rice, my veggie egg white omelets, (which I still love and eat) as well as eating five smallish meals a day. Yes! You know that diet I’m talking about!
Maybe it had something to do with the myth that eating more meals meant a machisma metabolism. But for me, having had disordered eating for a short period in my life, it was easier to wrap my head around smaller meals throughout the day, rather than eating larger ones more spread out. To me they were baby steps. And besides, it gave me back my power to be able to just eat, without stress, knowing it was building my body back up!
And I stuck with this low fat, multiple meal plan for many years, thinking low-to-no added fat, and many many meals, was the way to go. I’m not going to knock it, because I liked how I looked, felt and performed while I was training for bodybuilding, fitness competitions and endurance events.
And it was over the next several years, during the training for these events, that I learned more about how to use carbs for performance.
Cycling My Carbs
Although I eventually gave up sugar in the late 1980’s and early ’90’s, and cut down my overall carb consumption, I of course didn’t give up carbs completely while I was training, which was always pretty hard. I just limited carbs, in the right amounts, around my training, to make sure I had energy, my glycogen was replenished, and/or to prepare me for the next days training.
And if you know me, you also know that I’ve always trained with the intensity and volume of a Super HER-O Human!  (Well, up until my two surgeries, anyway). So, I needed carbs in my diet while I was working out hard. Remember, I was not keto adapted back then.
Note: When I’m talking about cycling carbs I’m talking about starchy carbs, not veggie carbs.
In fact, when I was about 16 weeks pre-contest in body building, and in my cutting phase, it was a very common practice for me to Zig Zag my diet and go five days lower/moderate calories and carbs, with the fifth or sixth day being a ‘cheat’ day eating anything I wanted (I still limited my choices to wholesome foods and didn’t go bananas, but I ate bananas!).
It was great for me mentally and socially, I never felt like I needed to binge, and I looked forward to it every week. I even made the day into a breakfast club, where each week my friends and I would choose a different breakfast spot in Berkeley to explore.
My favorite meal was a big, 1/2 inch thick multi grain pancake with smashed bananas on top, followed by non fat (usually sugar free) frozen yogurt in the evening! However, now that I’m learning more about the hormonal responses to food (which I’ll be writing about more later) I realize that there were years in my training that I probably could have cycled even more carbs, and fats, into my diet.
My Sugar Addiction Was Real And So Was My Cellulite!
But to be honest, ever since giving up sugar 25 years ago, after competing in my first body building show (I came in at 10.5% body fat), up until doing the Carbnite® Solution Plan, I’d had a fear of starchy carbs and sugar. And with good reason: because carbs and sugar can be addictive.
I know this personally, because I had a sugar (as in gum-balls) addiction from age 16-26 (I’ll be blogging about this in the future). Once I started eating them I couldn’t stop. And I’d buy bags full.
I was like Pavlov’s dog. Just the thought of going to the market made me plan out my route and do ‘drive-buys’ for binges. Drooling all the way! Just the thought of biting into that crunchy crust of sugar-coated gum made me salivate and run for that nearest gumball bin. As a result I carried a lot of extra belly and lower body fat during the periods when I ate them.
But here’s the thing: When I would give up the gum balls for a period of 3-4 weeks I would notice that the fat melted away like magic. After several trials of this new behavior I realized processed sugar was the culprit in making me fat and squishy. Because those were the only processed sugars I was eating by that time; besides the measured carbs I was using for recovery.
So after my first competition in the late 80’s, I gave up sugar for good, while continuing to limit my starchy carbs around my training. And I stayed naturally very lean and muscular as a result, with just enough fat in all the right places!
Sugar also made me quite lethargic and very emotionally depressed, which was another motivation for giving it up. I’m so glad I’m free of that addiction. But that’s another blog altogether!
In a nutshell, sugar and starchy carbs can make you fat if used incorrectly, and/or eaten in abundance at the wrong times, not to mention all the other unhealthy things it can do to your body.
And for us girls too many carbs and too much sugar (and well, just too many extra calories) can pack on cellulite…like it did with with me, on the back of my legs. Most of us girls struggle with that, and who needs anymore struggles! I didn’t, and I knew what the culprit was.
In fact, after finally giving up all processed sugar back in the late 80’s, and early 90’s after my first body building show, (it took me a couple years to really ‘get off’ sugar; and yes, I’m dating myself), and limiting carbs to support only my hard training days, I slowly got rid of all the fat on the back of my legs. Honestly it took many years of persistence, dedication and hard training so see it finally go away for good.
This is what cycling carbs will get you! This was my ‘5 days on, one day off ‘ ‘cheat’ meal plan. One inch thick pancakes were my friend!
And as for the washboard on my stomach (which I’m lacking now after my shoulder surgery recovery), well, let’s just say people began to drop their laundry off on my doorstep! Â I transformed my legs from dimpled to dazzling, and became a human washing machine to boot.
It was a lot of hard work, which included hard training sessions in the weight room, in the pool and on the track; while being mindful of how much I put in my mouth; and especially only eating carbs to suit my activity levels. So since then I’ve used carbs only to support my training. And I’m still sugar and processed-foods free.
But trust me…Nothing stays the same forever!! I had great success cycling my carbs strategically for many many years. But after back to back hip and shoulder surgeries, when I could no longer train like I had before, I needed to make some tweaks to my program.  And that’s why I decided to test out The Carbnite® Solution for a while and switch over to a ketogenic diet.
So, after my shoulder surgery in May 2012, and because my lack of training didn’t support eating carbs while recovering from surgery, I needed a program that would keep my metabolism humming, and not tank, while staying ultra low carb (ULC). As I’ll explain below, The Carbnite® Solution Plan would help me to do that. And… I thought it would be fun to use Carbnite® Solution along with my clients! Talk about support!!!
Last night I ate cookies, cakes and pies-all homemade and gluten free of course! I’m 4 months post shoulder surgery on the Carbnite® Solution Plan
So instead of falling into a completely carb free eating plan post surgery, I found that doing the Carbnite® Solution plan seriously while rehabbing my shoulder, and while I wasn’t training with intensity or volume after surgery, would be a good way to put carbs back into an ultra low carb lifestyle; and keep my leptin levels and other hormones working in concert for optimum fat burning and muscle maintenance.
After my hip surgery, (and here is Day 5 Post Op), it wasn’t such a problem since I could train my upper body, and do hard pool workouts, and utilize the starchy carbs to support my training. But without ‘training’ for several months post shoulder surgery, and knowing that I would be low carb, I knew that I would have to force myself to eat carbs so that my metabolism wouldn’t shut down. And at my age you have to do everything you can to help your metabolism along. I’m certainly not going to give up just because I had two surgeries!!
You see after staying super low carbs, even for as little as 7-14 days, your leptin levels (leptin is a hormone that helps regulate the thyroid so our metabolism stays on an even keel) start to decrease.  I’m not going to go into the science of how this works here, but if you are at all interested in making your body a fat burning machine I highly recommend the book , and to read Kiefer’s article about leptin here.
Here’s my Haiku:
“On Carbs”
Go long time with no,
Makes metabolism slow.
Eat carbs, now not low. -DebbyK
DebbyK’s Abridged Edition for Carbnite® Solution:
After an orientation period of 9 1/2 days of eating Ultra Low Carb (ULC) of only protein, fat, and less than 30 grams of net carbs consisting of mostly fibrous veggies, (the purpose of which is to get your body into a ketogenic state so it adapts to using it’s stored fat for fuel; and to shut off an enzyme that potentially turns carbs into fat), on the evening of the 10th day you spike your insulin levels super high by eating high glycemic, insulin spiking, low-fiber carbs. The following day you’re back to the ULC part of the plan for another 6 1/2 days, with your next night of carb loading and insulin spiking on the evening of the 7th day. Now, rinse and repeat, typically every 5-7 days, depending.
Actually you want that spike higher than high. And it’s not just about one little dessert and BOOM! your done for the evening. And thank god, because that would be such a tease! Not to mention it would ruin the whole shebang.
No, instead it’s this lovely window of 6-8 hours (women may do better with the shorter period) in which you keep your insulin levels spiked by eating some of your favorite high glycemic foods. Yup! Eat, rest, rinse and repeat, about every two hours, starting this party at around 4 PM.
Get it? Carb ‘NIGHT’Â !
According to Kiefer it only takes your body 6-8 hours of re-feeding it carbs to re-set your fat burning hormones and jump start your metabolism. Actually when you do this your body becomes a fat burning machine. Who knew!!
Now, even though this is a high insulin spiking re-feed, I still maintain a gluten- free, sugar-free, processed foods free-zone in my home (I’m a poet!). I like to describe my eating and lifestyle as ‘my own whole foods living with a primal flair‘. I try to eat in-season, fresh, whole foods that also have healing properties. Basically if it falls too far from the tree I don’t eat it! Although I admit it: I do use some Splenda  (which I’m slowly cutting out). Please don’t throw pebbles at me!
Some Cautions onCarbnite® Solution
If you plan to use Carbnite Solution, some things you’ll want to avoid in extreme quantities on this night of treats are table sugar and fat. And the timing of these two are very important; sugar in the first part of the night, and fat more towards the end.
This is because fat, eaten with high insulin spiking carbs, can potentially be stored as fat if eaten too early in the night, due to fat’s slow digestion time. So I limit the fat I eat on my treat night, and have it at the end of the evening, during the last hour or so.
And why not a lot of sugar? Well, for one, sugar is 50% fructose, and, as directly stated by Kiefer on his You Tube Video, “fructose, when you’re in an energy surplus, can be stored directly as fat”. Yuck! We don’t want that!!
Well, I just avoid sugar anyway since I’ve been committed to a life without refined sugar for the past 26 years and I don’t want it or crave it; and I limit fruit, since my body doesn’t react well to fructose anyway. So if you want to sweeten the pot, use dextrose as your main sweetener.
But, I love my bananas and berries as much as any Yogi Bear, so if Ido want fruit on my ‘Night Of Treats’ I have it, but limit it to small amounts, and try to have it early on in the evening when my depleted liver can use it. But since this is a night meant to enjoy yourself, if you want to have a french pastry, or some pancakes drizzled with maple syrup, by all means indulge yourself!!
Another NOTE: Carbnite® Solution is marketed as a ‘power diet’ for fat loss. My intention for using this program was NOT to lose fat. It was primarily to have a structure that I could follow while maintaining my low carb lifestyle to (a) keep my fat burning hormones in check, and (b) use a ketogenic diet to help optimize my body ability to  maintain it’s muscle while recovering.
In fact, my goal since my last surgery has been to increase my weight and gain some of the muscle back that I lost. I have done both. In the last few months, however, as I’ve increased my calories, I have also gained some fat. My non-scientific speculation is that this is some sort of evolutionary protection from being so lean pre and post surgeries, while also going through two traumas so close together.
However, I do believe that I may be going through some hormonal changes as a result of the trauma, as well as age related hormonal changes, which may also affect the distribution and accumulation of fat. Does this concern me? Yes, a little bit. I’ll be honest I loved my six pack.
Well, I may only have a two-pack now, but I’ve packed some size back onto my booty and I’m happy about that!
My Plan
I’m not sure how long I’ll stay on the Carbnite® Solution. As of late fall of 2013 I’m feeling strong and I’ve started to train heavier again with my legs, glutes, and back. Plus, I’m back in the pool now after my shoulder surgery, and I’m starting to crank it up there too! So, I think I’m ready to start cycling some carbs back into my diet based on my workout schedule. Plus, I just like the look and feel of my muscles better when they are filled with glycogen throughout the week.
For that, I plan on going back to cycling more carbs around my workouts, the way I used to do when I was training with more volume, while maintaining the ultra low carb portion of the day.
I also plan on incorporating the latest research and fat loss principals that I’ve learned from Carb Backloading® into my program (see sidebar and click on that picture of those 6 pack abs!), as well as any new protocols in the field of nutrition, fat loss and metabolism that may give women approaching menopause a better arsenal for a healthy fight against fat. Whatever I decide, I’ll be sure to let you know…
As a fat loss coach I’ve added the Carbnite® Solution and backloading protocols into my toolbox, along with  my other low carb/cyclic ketogenic and whole foods lifestyle plans. And my clients who are using these protocols are getting great results. Just take a look at my client Jos.
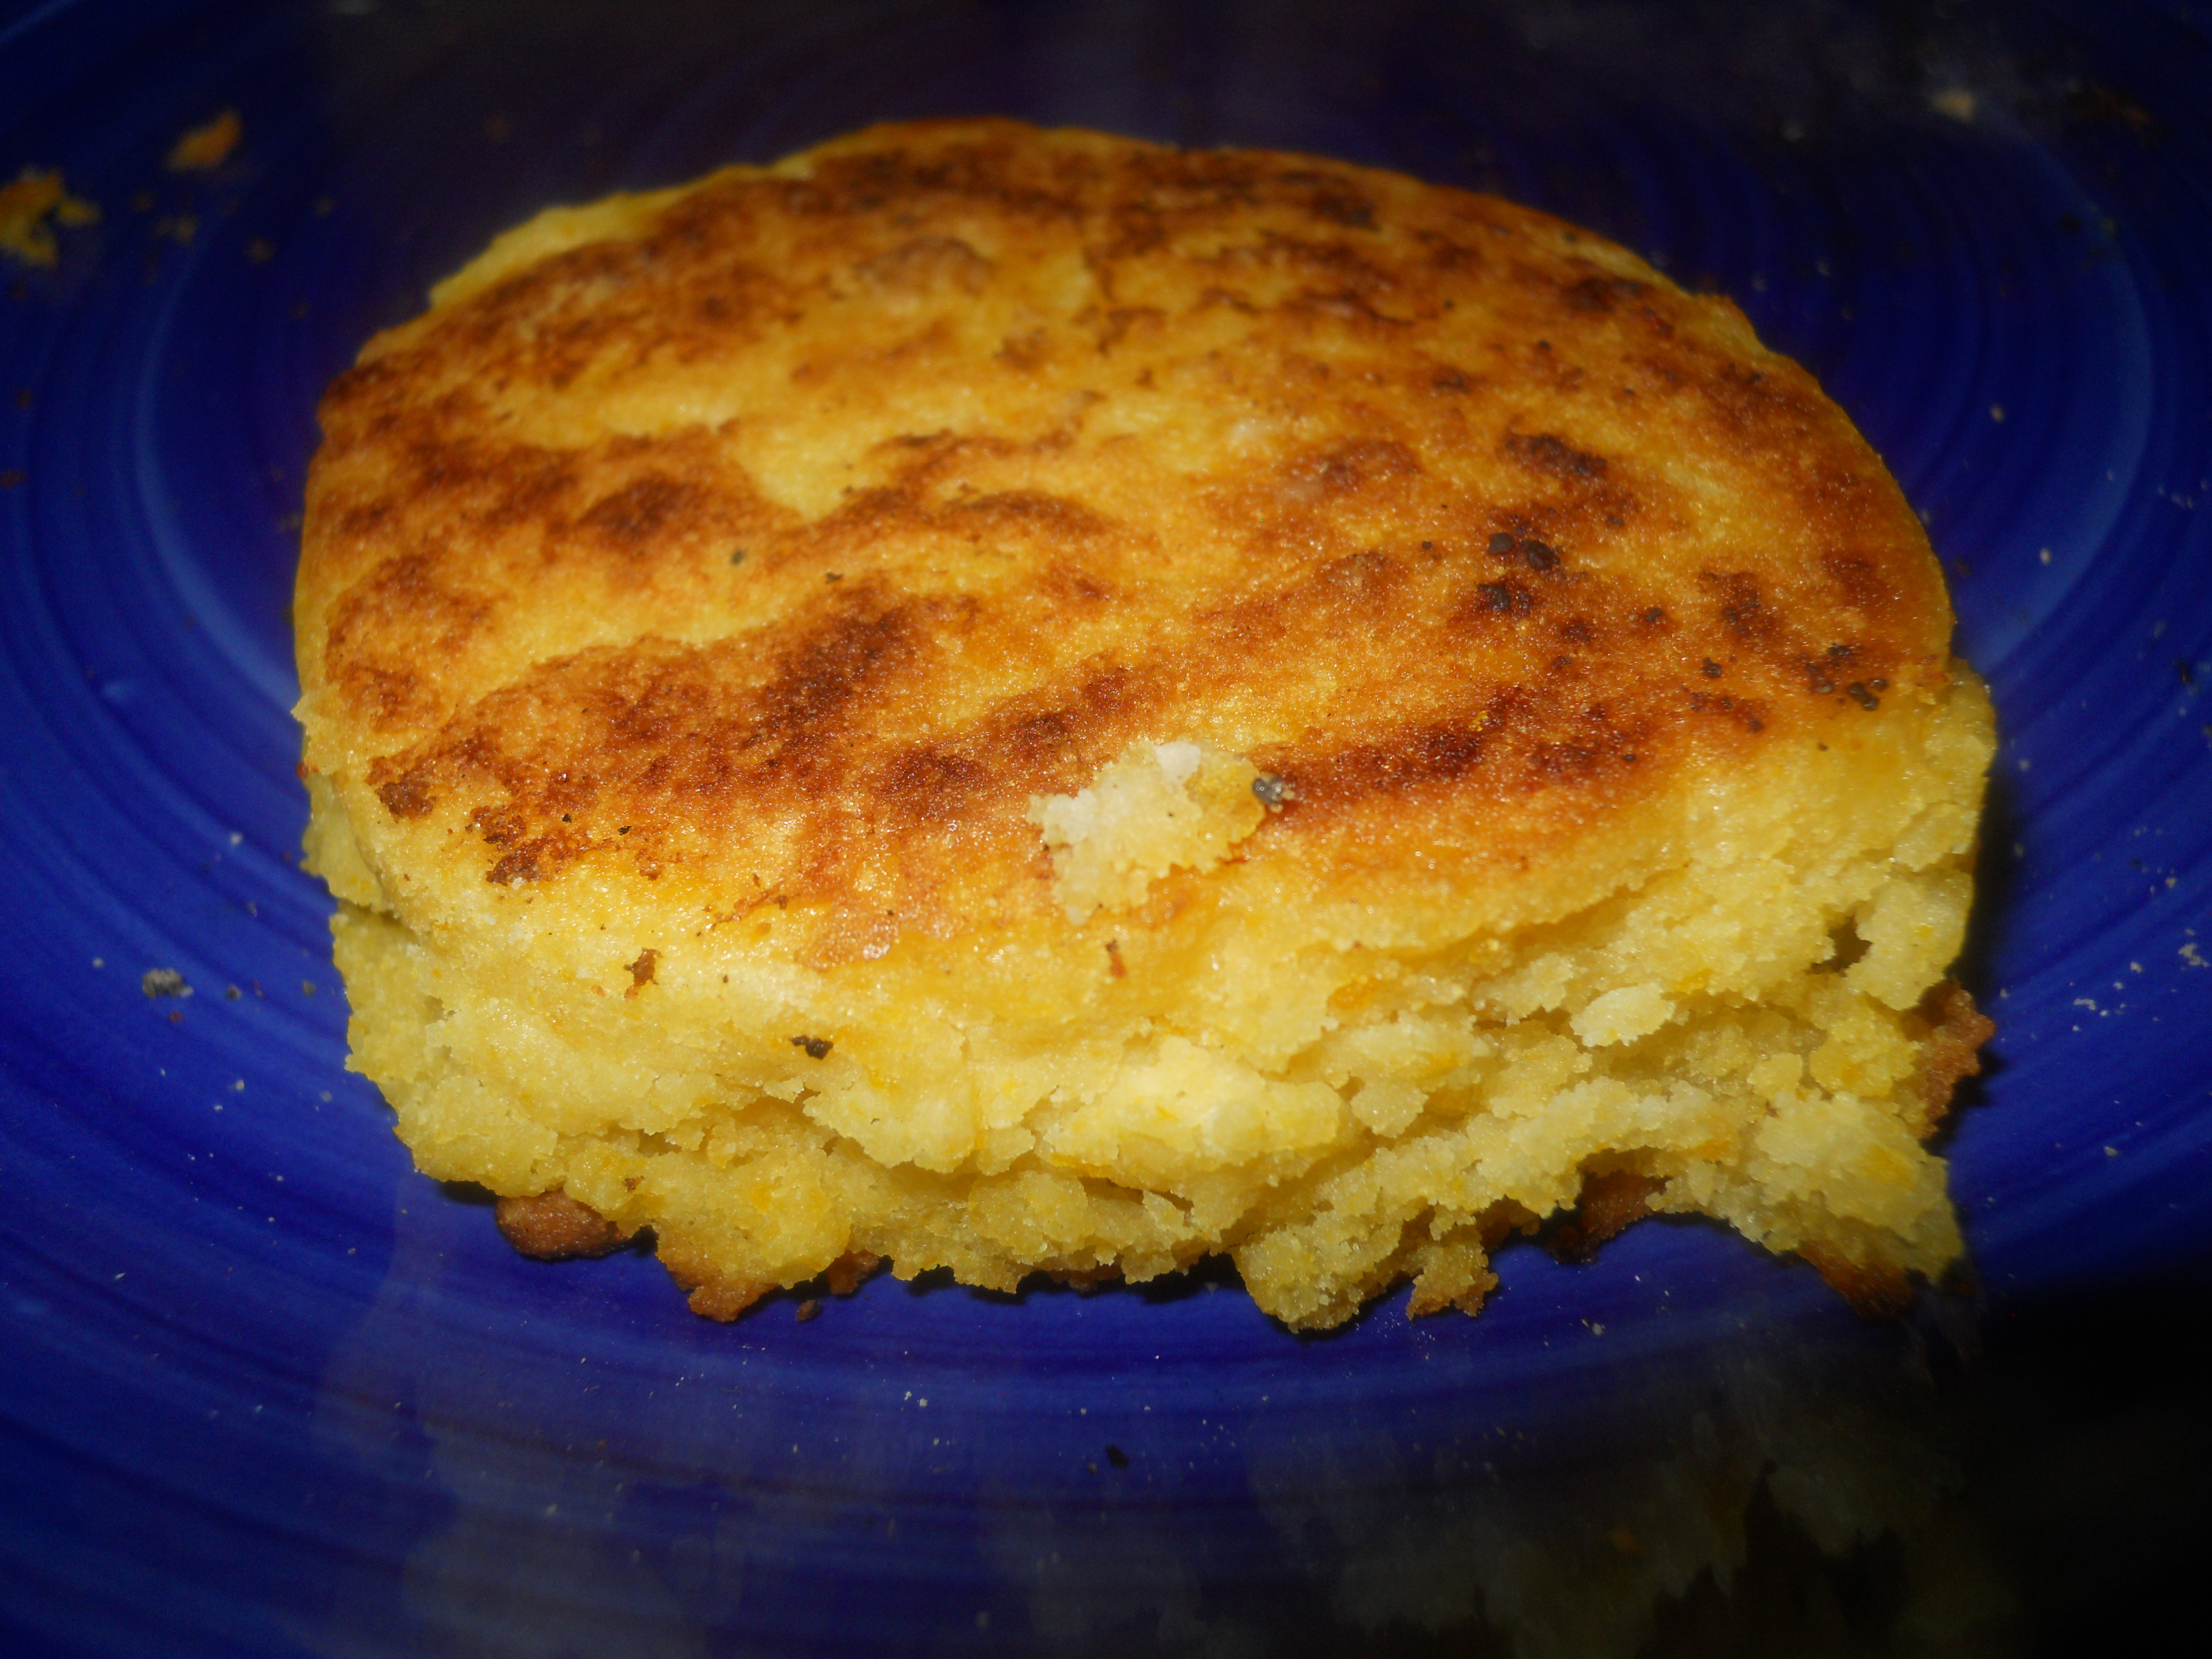
Gluten Free Rice Four Lemon Poppy Seed Muffins and Cakes
Plus, they’re having so much fun, which is key to any successful program. Â I mean what’s not to like: rice puddings, porridges, pies and poppy seed cakes one night a week!
And succulent savory ultra low carb meals, like slow cooked brisket, with pan roasted, caramelized red bells and brussel sprouts the rest of the week!
In fact, I’m having tons of fun creating gluten free recipes to use for those who indulge in the low and ultra low-carb lifestyle, as well as for those times for treating and re-feeding yourself with some high-carb creative cooking…and baking.
And yes, they will all be in future posts, Â if I can get myself out of the kitchen long enough to write them up!!
Only kidding…I promise, they’re coming.
And now… for some shameless self promotion!
If you want to know more about Carbnite® Solution and if it’s right for you, or if you’re interested in losing body fat, gaining muscle, increasing athletic performance, or just living a healthy and fit lifestyle while using a whole foods based diet plan that is sustainable, then please email me so we can talk about how my coaching can help you.
What fat loss programs have you used? Are they working for you?
I Love Art! It’s no wonder since I grew up with an abundance of art and music in my home; from an opera singer mom to an impressionist painting dad, as well as my brothers, sister and myself playing our various instruments and doing our own crafty things. And during those years IÂ was drawn to jewelry making, knitting, claymation, ceramics, cooking, tile making,photography, painting t-shirts, terrarium building and landscape gardening, to name just a few!
So of course I would classify myself as the creative type, possibly a diva!
But like most of us life got in the way, and it was hard to keep up with my crafting. And as I got older I found myself not doing much more than making Holiday cards and cookies! Then about 14 years ago, after a tragic event in our family, once again I had this sudden urgent creative itch, which ran deep.
At first this resulted in the medium of painting;. However, it didn’t take me long to realize I would never be Renoir or Van Gough. I can barley draw a line, let alone a circle. No, I was painting pots. You know, the red clay ones you buy at the garden store. I bought a few, went to the art store, stocked up on color and started painting away; which only resulted in a bunch of pots in my house that reminded me of my 5th grade art class. The passion was there but I needed more authenticity in its expression.
It didn’t take me long to realize that I should be building the pots I was going to paint, not buying them. I needed to get down and dirty in some clay; really make something… or attempt to anyway. So I found a ceramics studio in Oakland-near my apartment and conveniently right next door to my pool-signed up for a class, and fell in love with the art of building and molding things out of clay.
After a couple years of this, and a house full of eclectic pieces, I considered myself an artist and was energized by the thought of just going to class. I dreamed about pottery as much as I did about lifting weights!
But then, tragically, the studio closed down for renovation. Unfortunately I couldn’t find another suitable place to do my craft, since they were too expensive or too far a drive. And when the City of Oakland’s Studio One finally did open it’s doors again, in it’s swanky new building, the price for a session had nearly tripled. While my tax dollars had supported the building of a new art studio my budget was unable to support taking a class. So my art fell to the wayside.
Well, kind of. Fitness has allowed me to sculpt not only my own body but those of 100’s of others’. But with my recent two surgeries, one on my hip in October of 2011, and another on my shoulder in May 2012, it’s been hard training clients, do art, or even garden (and won’t be able to garden for several months). But that craving to create has never ceased. And it’s getting stronger.
Fast forward 12 years later
My passion for creativity has surfaced again and it’s like a tsunami! But now I have found a new art medium:Â the art of baking. And so here we are, at my fitness blog, drooling over pumpkins, pies and nutty crusts, and who knows what else that lies ahead!
What I really love about baking is that, just like working with clay, I can dream up anything; and using all my senses I can bring it to life. My hands now work again as they did with clay: I mold and shape the dough, I mix the ingredients into batter, and I fire, or now bake, what was once raw. And just as I did with my clay pieces, I hope my baked ‘piece’ turns out as intended. Sometimes it doesn’t because ovens, as with kilns, can be testy and temperamental, having their own intentions. And sometimes I end up with a flop! But who cares. I love the whimsy of both: art and baking.
So making my pumpkin pie tartlettes brought me back in time… to the old Studio One ceramics class. There you would find me one with the clay, transformed with intent, immersed in another world, throwing, plying and molding the mound with my hands; and bringing to life the various shapes and beings that I had no idea could come forth from the tips of my fingers. Just as it was with clay I now find myself in my closet kitchen-my culinary studio-hovered over my counter top doing the same.
Today I’m working with ground nuts, like I did with clay, and molding the delicate meal into a vessel that holds my leftover pumpkin pie batter, which is then baked into the mini, sweet, aromatic pumpkin pies. And let’s be honest, it’s a lot easier to lick your hands when they’re filled with ground nuts than it is if they’re yucked up with mud.
These spicy tartletes are 1/5th of the leftovers from my Perfect Paleo Pumpkin Pie. But you can make and use the entire batter which will yield about 26 mini pies.
I also did a new take on my Nutty Crust and Pumpkin Pie Batter, using more spices. Hope you like it. Let me know in the comments!
A creamy rich mini pumpkin pie, with a spiced, slightly salty crust, that I make from the leftovers of my Perfect Paleo Pumpkin Pie.
Author: Debby Kaplan
Recipe type: Dessert
Cuisine: American
Serves: 6
Ingredients
1 Cup Leftover pumpkin pie batter from Perfect Paleo Pumpkin Pie or 1 cup or your own leftover pumpkin pie batter.. Or the entire batter if you want to make 26 tartlettes.
Pumpkin Pie Batter
2 cups pumpkin, mashed ( I use real sugar pumpkins, not canned. If you use canned pumpkin use 1 15oz can but results will vary)
3 large eggs
¼ cups Vanilla Whey Protein Powder
1 can (15 oz) coconut milk, canned, full fat
1 teaspoon liquid stevia - vanilla cream flavored
1 teaspoon Pure vanilla extract (Use 1 more tbsp if no Vanilla cream stevia)
2 teaspoons cinnamon, ground
½ teaspoons nutmeg (adjust to taste)
½ teaspoon ground ginger (adjust to taste)
Nut Crust
½ cup, whole almonds, raw
⅔ cup, ground hazelnuts, ground
⅓ cup Finely ground, blanched almonds
1 tablespoon walnut halves, roughly chopped (OPTIONAL, as these were all I had left so I used them!)
2 tablespoons coconut oil metled
2 teaspoons cinnamon, ground
½ teaspoon ground ginger
¼ teaspoons fresh ground sea salt
Instructions
Crust
Pre heat oven to 350 degrees F
Line 6 muffin tins with liners (you will have approx. 6 tbsp of crust batter left over, which you can make into shells for something else!)
Combine all ingredients into food processor or blender. Pulse or grind til combined and meal sticks together in small beads. Make sure to stop before nuts have become butter.
Using 3 Tbsp of nut batter per muffin liner gently mold into liner making sure entire cup is covered in nut batter. Make sides are thicker than bottom and batter goes to top rim of liner.
Bake at 350 for approx 10 minutes
Let cool 10 minutes before filling
Make pie batter while waiting for crusts to bake (If not using leftovers, of course)
Be careful not to eat the pie batter while waiting, it tastes that yummy!
Batter
If using frozen leftover batter bring to room temperature and set aside and proceed to CRUST direction.
If using your own batter results may vary as well as nutritional information. I highly suggest making my lovely Pie batter.
In a blender or food processor add pumpkin, eggs, spices. Blend until combined. Slowly add coconut milk and continue blending until combined. Recipe makes 5 cups of batter. Approximately 1 cup of batter makes 6 tartlettes.
Gently add Approx 3 Tbsp of pumpkin batter into each of the nut crust lined muffin tins.
Bake for 18-25 minutes or until center of tartlettes are firm.
Check at 20 minutes and pull out of oven before tops of tartlettes turn brown
It's smelling really good right now!
Let cool 5 minutes
Keeping the tartlettes in the liners, remove from tins and place in open Tupperware container.
Place in refrigerator to set for an hour, and keep your hands off!
Store loosely covered in fridge. Will keep for about a week, if they last that long uneaten!
Notes
The entire batter will make approximately 26 tartlettes. You will need to triple the Nut Crust recipe.
You’re probably asking ”Hey, hey, where’s DebbyK ?” Well, if you’re getting my newsletters then your in the know.
What? Not subscribed? What the…? Get your crazy self over to my sidebar and click on that link so I can bug you with my my fitness and fat loss tips, and coming to you soon, my yummy recipes.
Kay now!…Â that’s settled…and thanks for subscribing.
So, here’s the four one one on why I’ve been out of touch with my fitness blogging and updates: For those of you who just recently subscribed I’ve had 2 major surgeries in the past year. For the first one I traveled far far away to the beautiful land of India for my hip resurfacing surgery, where they put a shiny new cobalt ball in my hip. That was last October. The 4th to be exact. It’s been a year already, OMG!
Well, thank god I’m not in pain anymore. But I’ll tell you it’s been a big freakin deal trying to get my body feeling normal again. And after a year I”m not nearly as in shape as I was. But that’s because when I got back I had to have another freakin surgery. It’s like I’m under construction from the bottom up. Now I know how Michelangelo felt painting the Sistine Chapel. It’s that painstakingly slow to rehab. So don’t sweat it if you have a bad day with your program. It’s all cumulative. Just keep pluggin’ away. K?
So, first surgery’s down, and then seven months later I had to go under the knife again for shoulder surgery. That’s only five months ago. Have you had shoulder surgery? Well, don’t. It was a BIGGER pain in the A#$ than the first one! Don’t ever get it. Because it feels like somebody’s pounding and drilling into your shoulder with a hammer, incessantly, minute after minute for at least six weeks. Not that I’ve ever had that happen to me, but if I did…hmmm…actually, come to think of it…well, you get the point. OK! I know…not much of an excuse for not blogging.
But don’t worry, while I was gone I was thinking all about you and what would make you feel warm and fuzzy. And considering my condition ( since it’s really hard for me to do fitness videos for you like I promised-and I’m really sorry for not having kept my word- even if I were to make workout videos, seriously, if you did some of the exercises like how I’m doing them now you’d be exercising like a one winged flamingo) I thought it would be in your best interest to wait a bit longer for the kick butt workout videos. So instead, I’m going to make you some yummy stuff to eat.
Well, not actually make you dinner and desert, as in you coming over to my place and having tea and all…
Rather, put many of my yummy healing treats and foods that have helped me keep this body happy, healthy, fit (considering) and lean for the past 30 years – not to mention during my surgeries – here on my blog. No Reservations Required!
Yummy stuff… like savory meals, and gluten free sweets, muffins, pies, cakes and butters.
Yup, you read that right….
And because I’ve been getting so many requests for DebbyK’s Coconut Butter recipes (I have many yummy flavors) I’ve decided to share one of my addictions basic recipes with you. My liquid gold.
Why Butter? Why Not Butter! Yum…
So while I was recovering after my shoulder surgery I began to research more about healing through nature and how our hormones play a big role in regulating our recovery. I knew that good fats, such as Omega 3’s, are vital in our body’s defense against aging and inflammation. But just as important as Omega 3’s are saturated fats. If I wanted to give my body the best chance at a strong recovery I would need more FAT.
… Actually, more saturated fats.
Wait, I know what you’re thinking, that fat’s not good for you, and it will make you..well… fat. Or drop dead. Or both. Especially saturated fat. I’ll die of a heart attack THIS SECOND, right?!
Now that’s ridiculous. I mean our paleolithic friends ate tons of fat… in meat, nuts and seeds. And they weren’t fat. But of course they weren’t sitting at their computers all day checking Facebook, reading blogs and munching on chips (Put those down and keep reading).
Well, that’s another blog altogether. In the meantime a good place to learn about fats, healing, and optimal health through diet is over at Robb Wolf’s website where you can also read up on why we need more of these good fats in our diets. And while you’re there make sure to read up on the the ‘Paleo Lifestyle’.
OkeeDoKee! Back to the fats. Fats such as coconut oil, red palm oil, grass fed butter and ghee, and coconut butter-a saturated fat- are all really good for you and should be the bulk of the fats and oils you use when cooking.
So you’re probably wondering what this here coconut butter has to do with my yummy healthy recipes that I’m putting together for you. Well for one, it’s become my go-to staple fat for much of my baking. And snacking…I don’t lie.
But coconut butter is so delicious that I don’t only use it for most of my general cooking like I’d use butter, plain virgin coconut oil and red palm oil for stuff like stir fry, soups, etc. That would be like melting gold to make one nail and then pounding it somewhere into the frame of your house. You don’t get the real beauty of it. A waste. No Can Do.
Nope.. I eat it by the spoonful…straight from the jar. I want the full sensation of this liquid gold.
This doesn’t last long in my house!
But the best is when I warm it up in a double boiler before I dip my spoon into the jar, and wait til it becomes really smooth and silky. And then, as my lips wrap around the spoon and the fat molecules explode in a crescendo of gooey goodness on my tongue, it warms my senses and brings back memories of sticking my fingers into Mom’s gigantic blue-ringed ceramic mixing bowl filled with cake batter…which makes me dip my spoon in for more.
Come to think of it maybe I am an addict.
Oh, I digress…when you make my recipe, coming up in my next blog post, you’ll know what I’m talking about. It really is like eating cake batter or vanilla frosting or even cookie dough. And there are endless other ways to melt into a blissful state while eating this treat: like putting a dollop in tea or coffee; dipping with fruit; or icing cookies, cakes and pies. OH MY!
And not only does it taste good it has many healthy and healing qualities.
Ninja of Oils
Coconut oil is the ninja of oils. Aside from tasting like heaven, check out this laundry list of it’s super duper qualities:
Weight Loss:
Coconut oil is an MCT (medium chain triglyceride). Instead of storing it as fat you burn it as energy. It’s like eating a piece of candy that won’t stick to your thighs. How’s that for liquid gold? It’s a super-food which will make you feel energized after eating it. So don’t be surprised if you start running sprints up and down your office hallways.
Coconut oil stimulates your metabolism, so it helps with energy levels and may help you to burn more calories each day.
Coconut oil, and it side kick the creamy butter, is a key nutrient that has helped many of my clients, including myself, to lose body fat while using the Carb Backloading and/or The Carb Nite Solution: The Physicist’s Guide to Power Dieting (Please not that I will receive a small commission from the sales of these books).
Boost Your Immunity:
Coconut oil has been shown to boost your immunity as well as kill harmful bacteria and viruses. Flu seasons coming, so stock up!
Coconut oil has been shown to kill the Candida Albicans yeast with it’s anti fungal properties.
Healthy Skin:
Coconut oil boosts moisture and elasticity in your skin. I would even consider that an anti aging remedy. Now I’m definitely down for stocking up!
Heart Health:
Coconut oil has been shown to reduce cholesterol and heart disease.
So, Eat Up America! This is one saturated fat you don’t want to miss out on.
Click HERE to get the recipe to my Liquid Gold Creamy Coconut Butter
I’ve been getting a bunch of emails lately asking what to do over the Holidays to stay on track with diet and exercise and how NOT to gain weight. You’re probably wondering what can possibly be done from now until Jan 1st to help fight the battle of the bulge that is about to take place.
A LOT…. But Start NOW! And then keep going….
Here are my tips and resources that will help you stay on track over Thanksgiving weekend, and the holidays, and may actually help you burn the fat while eating your apple pie:
DO THE ZIG ZAG
What? Some kind of new workout move? Not really. It’s more like a shuffle…of your calories.
Back when I was bodybuilding, and counting calories, it was common to cycle the amount of carbs and calories we would eat during the week, eating a few days of calories below our baseline metabolic rate, and then a ‘cheat’ day way above, and then back to our baseline. As the contest got closer and we needed to make weight class the baseline would be lowered, but always fluctuating the daily calories with highs and lows on different days of the week, to balance out the total calories for that week.
Some days would be base metabolic rate, while others would dip 300-500 below or 300-500 above that rate over the course of 5-7 days. The overall weekly caloric intake would average out to what our goal base metabolic rate was determined to be in order to lose body fat while maintaining lean muscle -Â and get those ripped abs.
Holiday Abs_Elton Lobos Photography
The great thing was there was always one big’cheat’ day where we could eat anything we wanted. For me it was like Thanksgiving day, but of Pancakes…a lot of pancakes!
Although our diets were precisely manipulated during competitions, the same principal can be used around the holiday season. I mean, what’s the first thing on most of our minds for the next 6 weeks? OK, besides the holiday gifts! You guessed it……..Not gaining weight during the Holidays, right?
HAVE YOUR CAKE AND EAT IT TOO
Zig Zag , or Calorie Cycling, is similar.
In a nutshell: Since our bodies are meant to survive famine and hold on to fat when it thinks it is is starving – like when we diet – it will also lower it’s metabolism. And if your metabolism slows down then your body will not burn fat for fuel, but rather store it instead. (Note: Future blog…make sure to check back soon).
Hey! Isn’t that the exact opposite of what we want?
Yes, my friend it is. But here’s the concept…
FEAST WITHOUT THE FAMINE
With Zig Zag, or what’s called calorie cycling, the theory is that your body never has a chance to store the extra calories as fat if you cycle your calories. Some days are higher and some are lower, but all adding up to meet your target caloric intake for that week. You are tricking your body into thinking it’s not dieting, so there is less chance of holding on to fat. This is not the case if you lower your calories for too long a period and maintain them at that low number while also continuing a weight/fat loss program . (Hmmm! Make Note: Another follow up blog, so check back soon).
There is very little research done on this and it is all very much anecdotal in evidence but I can swear from my own experience and that of many of my client’s, including Paul Piotrowski, (who was on it for a short period and did see some results), that cycling calories, if done correctly, will trick your metabolism into a fat burning machine. And psychologically, I think it’s easier to stick to a diet when there is a ‘cheat’ day.
According to my friend Mike O’Donnell,, over at The IF Life, you can.  It’s called Intermittent Fasting. He even wrote a book on it. Basically you’re eating less around the days you are partaking in pumpkin and cream pies.
Eat this and lose fat?
Here’s what Mike, over at IF says:
So if you know a party is coming up, eat a little less the day before(focus more on low calorie foods like leaner proteins, fruits and vegetables) and the day after so you do not have a calorie surplus over the long run! Eat less meals to get there, such as 2 meals. This is the simple strategy that you can also apply to your year-round lifestyle. Using intermittent days to eat lessand and still enjoy foods you like while losing weight.
And, of course, the trick for the long term with any meal plan is to stay on track with Real Whole Foods.
YOU REALLY ARE WHAT YOU EAT
Counting calories is not for everyone. You have to be quite dedicated on a plan like this. But even if you don’t stick to a program such as this one it’s a great place to start. Now is a good time to get to know the true amount of what’s going down your gullet daily.
Do you really think you eat at your baseline metabolic rate to maintain your current weight?
Have you ever wondered why you are not losing weight? Or are you losing weight but your body has turned all squishy?
Have you noticed you now are 2 pants sizes larger?
Is this YOU?
Did you know that research has shown that most people eat 25% more than what they think is their baseline. So that can add up week after week, year after year, especially over the holidays if you don’t balance it out.
So fear not my friends. With some careful planning and some useful online tools you can still eat your treats for the holiday while warding off the unwanted weight and trick out your metabolism to make your body look and feel sweet.
HERE’S HOW IT WORKS
Let’s use me as an example. I weigh 124 lbs and I’m 5’6″. Using this online calculator we come up with these numbers in the chart below. Keep in mind that I am choosing to maintain my current weight. As you can see from the table below on Wednesday I would be able to eat 2506 calories; over 500 calories more from my target base of 2088. YUM! YUM!
Ex Fat Loss
Fat Loss
Maintain
Monday
1253
1671
2088
Tuesday
1003
1337
1671
Wednesday
1504
2005
2506
Thursday
1253
1671
2088
Friday
1128
1504
1880
Saturday
1379
1838
2297
Sunday
1253
1671
2088
*Calorie cycling provides same amount of calories per week, but ‘tricks’ your body by constantly changing daily calories. This helps to prevent or break plateaus. Guideline only.This is also taking my activity level into consideration. Get get the point? I can sample some sweets while I still attack fat!
And You Can Too!
You may have to do a little bit of homework over the holidays and work out the math.
But go ahead and gulp some eggnog guilt free.
It might be a challenge for some of you. But I recommend you read up on IF and give calorie cycling a try over the next 6 weeks. You may even lose weight and burn fat while your at it.

 Hi Your Fit Day Friends!


 Hi Your Fit Day Friends!


")


